


The Complete Picatinny Light Mount Guide
Published on: May 4, 2026
Reading time: 6 mins 2 sec
Mounting a weapon light to a Picatinny rail sounds simple—until mount styles, position variables, and compatibility traps stack up against you.
The right Picatinny light mount isn’t just about holding a flashlight in place. It’s about maximizing beam coverage, keeping other accessories accessible, and making sure your setup holds firm under recoil.
Highlights
- The MIL-STD-1913 Picatinny rail is the military-grade standard that enables accessories to be universally swappable across platforms.
- There are five mount types—inline, offset, cantilevered, quick-detach, and ring-clamp—and each serves a different purpose.
- Picatinny and Weaver rails look alike but aren’t the same; mixing them up causes wobble and fit problems.
- Your light’s clock position on the rail directly affects activation, hand placement, and suppressor shadow.
- Not every mount works with every light—Scout-footprint, rail-clamp, and ring-clamp systems are all different.
What Is a Picatinny Light Mount — and Why It Matters More Than the Light Itself
Understanding the MIL-STD-1913 Rail Standard
The Picatinny rail—formally MIL-STD-1913—is a U.S. military standard for universal attachment of weapon accessories. Developed at Picatinny Arsenal in New Jersey, engineer Gary Houtsma drafted the dimensional requirements, while Richard Swan of A.R.M.S. holds the original patent—both shaped what became the global standard. Its slots are 0.206″ wide and spaced 0.394″ apart, center-to-center, identical across every compliant rail on every platform.
That consistency means any MIL-STD-1913 accessory fits the same way, whether you’re on an AR-15, AK, shotgun, or a pistol with a rail frame. Worth noting upfront: Picatinny and Weaver rails look nearly identical but aren’t interchangeable—Weaver slots are narrower (~0.180″) with no standardized spacing.
Why Mount Position Affects Everything
Where your mount sits—and the angle it puts your light at—affects your beam angle, suppressor shadow, support-hand access, and whether you can reach your activation switch without breaking your firing grip. Most people obsess over lumens and overlook this entirely.
A poor mount choice can make a high-output light perform like a budget one.
Types of Picatinny Rail Light Mounts — Know Before You Buy
Inline (Straight) Mounts
These keep the light parallel to the bore—clean, low-profile, and easy to activate. They work well on unsuppressed setups, but on suppressed rifles, the light sits behind the can and throws a shadow across your target.
Offset (45-Degree) Mounts
These rotate the light 45°—typically to the 1:30 or 10:30 clock positions. This clears IR lasers and DBAL devices while keeping your support hand in a natural grip. Most offset mounts run either upright or downward, giving you four clock positions. Tradeoff: you’ll need a slight rifle cant to put the beam straight downrange.
Cantilevered / Forward-Extension Mounts
These push the light forward past the handguard toward the muzzle—the cleanest fix for suppressor shadow. Useful on short-barreled rifles, too. Just don’t extend past the muzzle; barricade contact causes damage.
Quick-Detach (QD) Mounts
These use a lever or button for tool-free removal. A quick-detach mount is ideal for users who run a single light across multiple platforms. The key thing to look for: return-to-zero consistency. A QD mount that shifts on reinstallation defeats the purpose entirely.
Ring-Style Clamp Mounts
These grip a flashlight by its body diameter. Most accept 1″ (0.75″ to 1.03″). They let you use any standard flashlight as a Picatinny mount when your light doesn’t have a Scout footprint. Always measure with calipers before buying.
Picatinny vs. Weaver Rail—Don’t Mix These Up
Picatinny uses 0.206″ slots with standardized 0.394″ spacing. Weaver uses narrower (~0.180″) slots with no standardized spacing. The critical rule: Weaver rail light accessories generally fit Picatinny rails because the slots are wider. But Picatinny-spec mounts often won’t seat on Weaver rails—the locking lugs are too wide for the narrower slots.
A mount that rocks under recoil shifts your beam off-target at exactly the wrong moment. Always verify with the manufacturer before mixing rail systems.
Step-by-Step: How to Mount a Weapon Light on a Picatinny Rail
Tools and Prep
Before you start, have these ready:
- T20, T27, and T9 Torx drivers
- Torque screwdriver or torque wrench
- Loctite 243 (blue, medium-strength) or Loctite 222 (purple, low-strength)
Verify the firearm is completely unloaded. Clean the rail—debris between the mount and rail causes rocking.
Keep in mind: We strongly advise you to seek professional help if you find the following instructions challenging.
Installing a Scout-Footprint Mount
- Remove the factory Picatinny adapter from the light body using a T9 Torx. The aftermarket mount replaces it.
- Align the mount’s slots with the rail slots and slide into position.
- Finger-tighten the clamping screw first, then torque to 30 in-lbs.
- Attach the light body with the provided screws. Use Loctite 243 for most builds, or 222 for screws you’ll service often—both are manufacturer-approved. Avoid red Loctite; it’s designed to be permanent, requires heat to remove, and risks stripping small aluminum threads.
- Torque light body screws to 20 in-lbs.
- Function check: activate the light and apply firm hand pressure. Nothing should shift.
Installing a Ring-Clamp Mount
- Fully loosen the ring clamp and slide onto the rail.
- Insert the flashlight body and center it for balance.
- Tighten clamp screws by alternating sides to prevent canting.
- Torque to spec—snug plus a quarter-turn if no spec is listed.
- Test rotation resistance with firm thumb pressure. If it moves, it’s not tight enough.
Clock Position and the Thumb Press Test
12 o’clock is the top, 6 is the bottom, 3 is the right, and 9 is the left. Right-handed shooters typically start at 1–3 o’clock; support-side activation works best at 9–11 o’clock. To minimize shadow, position the light at or above the bore axis.
Once mounted, do the thumb press test—reach your tailcap or pressure pad without changing your firing grip. If you can’t get there naturally, adjust the position.
Common Mistakes to Avoid
- Over-torquing light body screws (strips aluminum threads)
- Using red Loctite (permanent—requires heat to remove, risks thread damage)
- Mounting too far rearward (awkward activation, more shadow)
- Skipping return-to-zero verification after QD reinstallation
- Not cleaning the rail before installation
Matching Your Light to Your Mount
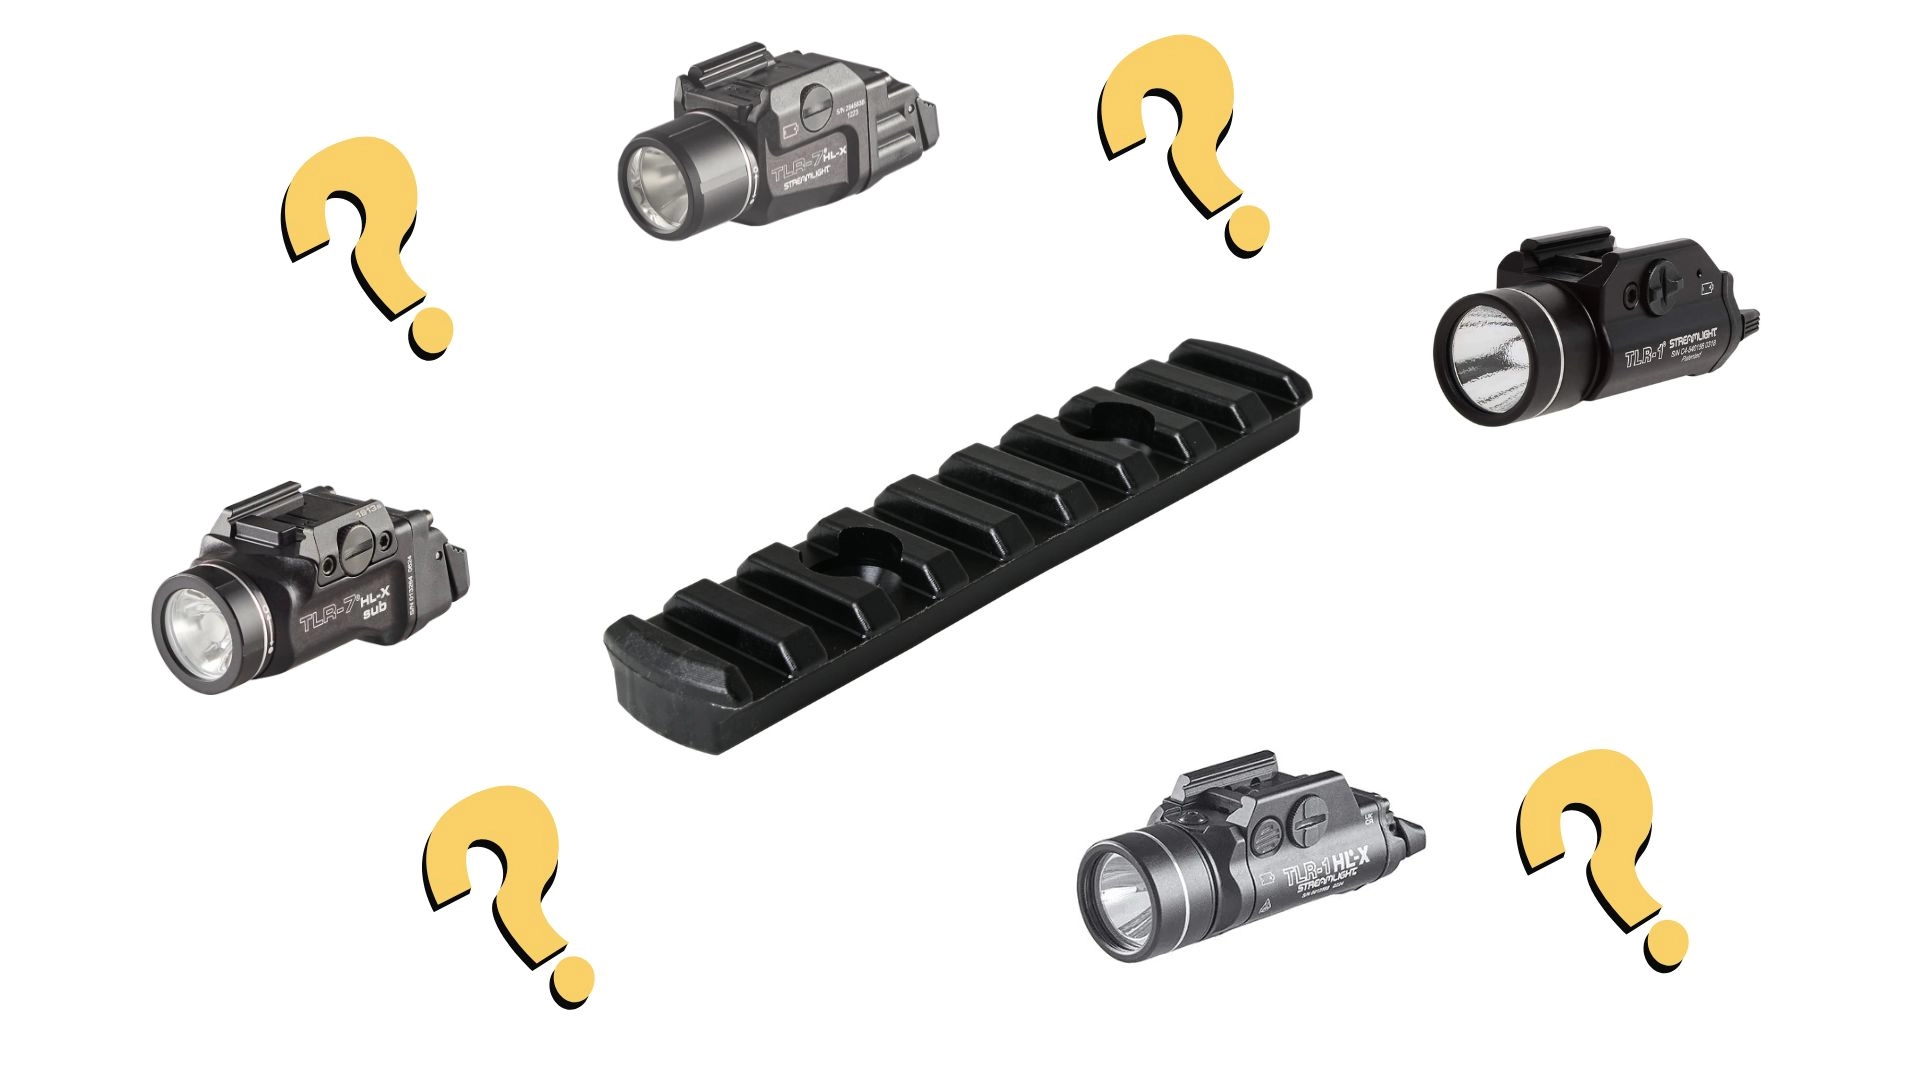
The SureFire Scout two-hole footprint became the industry standard after it was first introduced in 2006, and the aftermarket support it’s built is enormous. Compatible families include the SureFire M300/M600 series, Streamlight ProTac HL-X and Rail Mount 1/2, Modlite PLH/PLHv2/OKW, Cloud Defensive REIN series, and Arisaka 300/600/18650.
Scout-footprint mounts are not interchangeable with X300-style integral rail-clamp lights. Lights like the SureFire X300 and Streamlight TLR-1/TLR-2 use a built-in clamp that locks directly onto a rail-mounted light slot—no separate mount needed, but you’re locked into a fixed clock position (typically 6 o’clock). Scout-footprint lights with aftermarket mounts give you far more positioning freedom.
Standard 1″ body flashlights need a ring-clamp mount. Measure actual body diameter with calipers.
Best Picatinny Light Mounts—Our Top Picks
Best Overall: Arisaka Defense Offset Scout Mount (Picatinny)
CNC-machined from 7075-T651 and 6061-T651 aluminum with MIL-A-8625 Type III hard coat anodize. Compatible with SureFire M300/M600, Modlite PLH/OKW/PLHv2, Streamlight ProTac HL-X, and Arisaka 300/600/18650. Runs upright or downward for four possible clock positions.
Best Quick-Detach: ADM QD Offset Scout Mount
Lever-actuated, tool-free release with proven return-to-zero performance. Best for multi-platform users.
Best Budget: Magpul Rail Light Mount (MAG498)
Reinforced polymer in left (11 o’clock) or right (1 o’clock) versions. Includes Scout hardware and ring adapters for 0.75″–1.03″ bodies. Built-in thumb ramp for consistent activation.
Best for Suppressed Rifles: Arisaka Lightbar Scout Mount (Picatinny)
Cantilevers the light forward to eliminate suppressor shadow. Available in Picatinny, M-LOK, and KeyMod. Made in the USA.
Best Low-Profile: Arisaka Side Scout Mount (Picatinny)
Tucks the light beneath an ATPIAL-C or PEQ-15, clears DBAL QD levers. Ideal for quad-rail builds where every inch of rail space counts.
Frequently Asked Questions About Rail-Mounted Lights
Can I use a Weaver rail light mount on a Picatinny rail?
Usually, yes—Weaver accessories typically fit Picatinny rails. The reverse often fails. Verify with your manufacturer before mixing systems.
What’s the difference between a QD mount and a standard mount?
A QD mount releases without tools; a standard mount needs a driver. Premium QD systems hold zero reliably and are worth it for multi-platform setups.
Do I need Loctite?
Yes—on the light body screws. Use 243 (blue, medium-strength) for most builds, or 222 (purple, low-strength) for screws you’ll service regularly. Skip Loctite on QD lever mechanisms. Steer clear of red Loctite on these fasteners—it’s permanent, requires heat to undo, and can strip small aluminum threads.
How do I stop barrel shadow?
Position the light at or above the bore axis. An offset mount at 1:30 or 10:30 helps on unsuppressed rifles. For suppressed setups, a cantilever mount that projects the light past the can is the real fix—clock adjustments alone won’t cut it.
Will any Picatinny flashlight mount work with any light?
No. Scout-footprint, integral rail-clamp, and ring-clamp systems aren’t interchangeable. Know your light’s mounting system before you buy.
Conclusion
Getting your Picatinny light mount right comes down to four things: your light’s footprint, your rail system, where you need the beam, and whether you need to share the light between platforms. Inline mounts keep things minimal. Offset mounts clear accessories and tuck the light close. Cantilever mounts solve suppressor shadow. QD mounts give you flexibility. Ring-clamp mounts cover everything else.
Once you know your mount type, the install is straightforward—30 in-lbs on the clamp, 20 in-lbs on the light body screws, and blue or purple Loctite on the light body fasteners. Do the thumb press test before you call it done.
If you’re interested in weapon lights, feel free to browse our catalog or call us at 713-485-5773.
Disclaimer: The products and information in this guide are intended for responsible, law-abiding adults. Always verify that your firearm accessories comply with all applicable federal, state, and local laws before purchase or installation. Incorrect mounting can result in equipment failure, injury, or property damage. Always follow manufacturer torque specifications. This guide is for informational purposes only and does not constitute legal or professional gunsmithing advice.
Comments