


Red Dot Brightness Settings: Day vs. Night Tips
Published on: May 18, 2026
Reading time: 9 mins 17 sec
Getting your red dot brightness wrong doesn’t just hurt accuracy—it can cost you critical seconds when it matters most. Whether you’re heading to a sunny outdoor range or running your optic in a low-lit defensive scenario, the right brightness setting changes everything.
It’s not just about making the dot visible—it’s about making it usable. This guide breaks down how to optimize for both daytime and nighttime conditions, when manual control beats auto-sensors, and the common mistakes that quietly cost you performance.
Highlights
- Incorrect red dot brightness causes dot washout in daylight and a blinding starburst at night.
- Most optics offer 8–12 daylight settings plus 2 NV-compatible settings at the lowest end of the scale.
- Manual brightness control outperforms auto-sensors in mixed and tactical lighting situations.
- Your zero doesn’t change between lighting conditions—only your visual acuity does.
- A pre-shoot brightness check is one of the fastest ways to improve your optic performance.
Why Red Dot Brightness Is More Critical Than Most Shooters Realize
The Real Cost of Ignoring Brightness Adjustment
Wrong settings slow you down. If your dot isn’t matched to your environment, your eye works harder to find it, process it, and confirm your point of aim—and that costs time you don’t have.
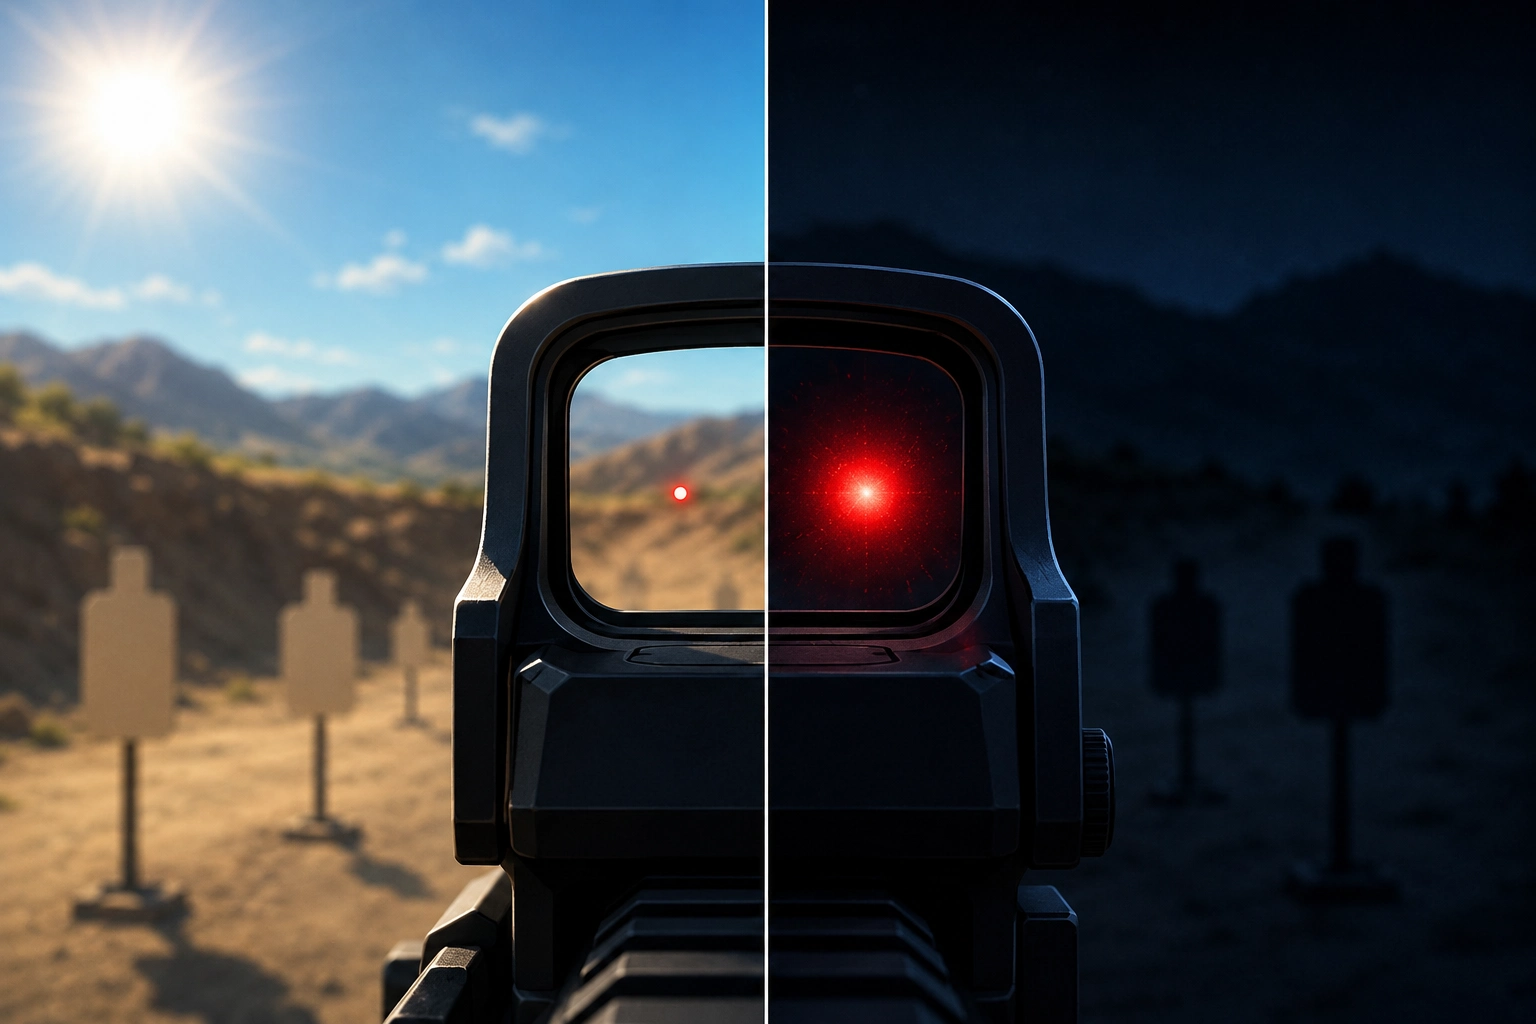
Two specific problems stand out. The first is dot washout in daylight—when ambient sunlight overpowers your LED emitter, the dot fades and becomes nearly invisible. The second is the starburst effect at night—when brightness is too high in low light, the dot blooms into a halo that bleeds across the lens and obscures your aiming point.
Both errors increase your time-on-target and degrade shot placement. Here’s what most shooters miss: they blame the optic or their eyes when the real culprit is a brightness setting that hasn’t been touched since the last range trip.
How Red Dot Brightness Technology Actually Works
A red dot sight uses a small LED emitter to project a reticle onto a coated lens, which reflects it back to your eye. Understanding how red dot sights work helps clarify why brightness management matters so much.
Most modern optics offer between 8 and 12 daylight optic settings, plus typically 2 night-vision-compatible settings. Those NV settings sit at the lowest end of the scale—not the highest—because night vision devices amplify light, making even a dim dot appear blinding through a monocular.
Your controls will be either manual or auto. Manual means you set it yourself; auto means a sensor reads ambient light and adjusts. Some optics let you switch between both. One more thing worth knowing: larger MOA dots appear brighter and more bloomed at the same setting than smaller ones—and that difference matters especially at night.
Daytime Red Dot Brightness: Optimizing for Sunlight
The Biggest Daytime Challenge—Reticle Washout
Washout happens when the light around you is stronger than your emitter’s output. Direct overhead sunlight is the most common trigger, but shooting toward a bright sky or in high-reflection environments like snow or sand produces the same effect.
Budget optics with fewer brightness levels struggle most here. If your dot is fading with brightness already maxed, that’s a hardware limitation. Worth noting: if your optic offers green reticle options, green has a natural visibility edge in daylight. The human eye’s peak daylight sensitivity falls around 555 nm (yellow-green), which is why green dots tend to stand out more readily in bright outdoor conditions.
Recommended Daytime Brightness Settings by Scenario
These ranges assume a 10-step optic. Use them as relative guidance and adjust based on your specific model:
- Overcast or cloudy outdoor: Mid-range (5–7). The dot should look crisp, not glowing.
- Bright sunlight, neutral background: Upper-mid (7–8). Push higher if the dot starts fading.
- Direct sunlight, bright sky, or reflective surfaces: Maximum or near-max (9–10+). Don’t hold back.
- Indoor range with artificial lighting: Low-to-mid (2–4). Controlled environments need minimal output.
Quick field test: if your dot has fuzzy, spreading edges, it’s likely too bright for the conditions. Keep in mind that astigmatism can produce a similar effect independent of brightness—so if the fuzziness persists even at the lowest settings, that’s worth checking with an eye care professional.
Tips for Maintaining Visibility Without Overdriving the Reticle
An anti-reflective device (ARD)—sometimes called a honeycomb lens cover—cuts glare noticeably without requiring any red dot adjustment on your part. It’s especially effective in direct sun. Quality lens coatings built into the optic itself also improve contrast, reducing how high you need to push brightness to get a clean dot.
Shooting angle matters, too—repositioning your stance relative to the sun can reduce washout in the field without touching a single button. And make it a habit to set brightness before stepping to the line, not mid-drill.
Nighttime Red Dot Brightness: Optimizing for Low Light and Dark
Why Night Settings Require a Completely Different Approach
At night, your pupils dilate, and your eyes become far more sensitive to light. An over-bright dot becomes genuinely blinding—not just distracting. Most newer shooters don’t expect this, which is why it’s one of the most common low-light mistakes.
Blooming is what happens when LED emission spills beyond the dot and bleeds light across the lens. If you have astigmatism, this is even more pronounced—what’s already a bloom becomes a full starburst or comet streak. For affected shooters, dialing brightness down is often the most effective single fix available.
There are three nighttime situations, each calling for a different approach:
- Ambient low light—dusk, dawn, dimly lit indoors
- Complete darkness
- Night vision device use
Low-Light Conditions—Dusk, Dawn, Dimly Lit Spaces
For ambient low-light environments, a lower-mid setting (roughly 3–5 on a 10-step optic) is your starting point. The dot should be just visible against your target—no glow, no halo.
Background contrast drives this decision. A dark background calls for a dimmer dot. But if you’re aiming at a bright target in a dark room—like a lit window—a slightly higher setting may keep the dot readable against the contrast. Adjust based on what’s in front of you, not just what’s behind.
Complete Darkness—Pushing to Minimum Settings
In complete darkness, the instinct is to turn the brightness up. That instinct is wrong.
Even setting 1 or 2 on a standard daylight scale can feel too bright at first. Before you settle on a setting, give your eyes time to properly adapt—the initial cone adjustment takes about 5–10 minutes, but your rods (which handle true low-light vision) need 20–30 minutes to reach full sensitivity. Work with the dimmest setting where you can still clearly locate the dot. Going higher doesn’t help you see more; it bleaches your night-adapted vision and turns the inside of your lens into a light source.
Night Vision-Compatible Settings—What They Are and How to Use Them
NV-compatible settings aren’t a separate system. They’re the lowest tier of your optic’s brightness range—intentionally dim enough for use alongside a night vision device, which amplifies ambient light and makes even a low daylight setting look blinding through the lens.
On most NV-capable optics, settings 1 and 2 are the NV-only positions at the bottom of the standard brightness scale. Aimpoint is a notable exception—depending on the model, the first four to seven settings are the NV range. Optics confirmed to carry NV-compatible modes include Holosun (most models), the Trijicon RMR Type 2 (adjustable LED version), the Leupold DeltaPoint Pro NV, and select SIG SAUER Romeo models. Not every optic has NV settings—always check your manual before assuming yours does.
Manual vs. Auto-Brightness: Which Mode Serves You Better?
The Case for Manual Brightness Control
Manual control means you decide what the dot looks like—not a sensor that may be reading the wrong conditions. The clearest failure mode: point your weapon-mounted light forward in a dark room, and your auto-sensor reads darkness at the rear of the optic and dims the dot right when you need it most.
Most serious shooters and instructors running optics for duty, defensive carry, or competition prefer manual for exactly this reason. Treating your red dot controls adjustment like a pre-engagement routine—the same way you’d check your magazine—is what makes your system reliable under pressure.
When Auto-Brightness Is Useful (and When It Isn’t)
Auto-brightness has a real place—casual range sessions, hunters moving between shaded cover and open fields, and newer shooters still building adjustment habits. When light changes gradually, it keeps up reasonably well.
Where it breaks down: when your optic is holstered, the sensor reads enclosed darkness. When you draw, the dot jumps to full brightness—jarring in a low-light situation. It’s a convenience feature, not a tactical one. Auto-brightness can be a useful baseline, but manual override should always be your fallback.
The Hybrid Approach—Using Both Strategically
Some optics, including several Holosun models, let you toggle between auto and manual mid-use. A practical workflow: let auto-brightness establish a starting point, then fine-tune manually. Battery savings come from auto-mode settling at lower appropriate settings rather than running max manual output all day—a real advantage for daily carry.
Building a Brightness Adjustment Habit
The Pre-Shoot Brightness Check Routine
Before you leave your vehicle, take three seconds to match your brightness to where you’re going. Day? Mid-to-high range. Night or indoors? Dial it down. At the range, adjust before moving between indoor and outdoor stages—not while you’re on the line.
One underrated physical tip: practice pressing your brightness buttons through clothing or gloves. Some optics with rear-panel buttons can be adjusted without drawing from the holster. Build that into dry-fire so it’s instinctive when it counts.
Transition Drills—Moving Between Light Environments
Transitions are where brightness management becomes an actual skill:
- Moving indoors from outside: Tap brightness down 2–3 clicks before entering.
- Moving outside from indoors: Tap brightness up 2–3 clicks as you step out.
In a defensive context, walking through a door with a maxed-out dot in a dark room means you’re fighting bloom exactly when clarity matters most. Build both transitions into your live-fire and dry-fire routines until they’re automatic.
Your zero doesn’t change between lighting conditions. The bullet still goes where the dot is. What changes is your visual acuity—and managing brightness is really about managing that.
Brightness Settings and Battery Life
Higher sight brightness settings pull more current. Running max output continuously will drain your battery far faster than using a mid-range setting for the same conditions.
The rule: use the lowest setting that gives you a clean, crisp dot—not the lowest period, but the lowest that works. If your optic has a motion-activation standby feature (Holosun calls it Shake Awake, Leupold calls theirs Motion Sensor Technology), enable it for daily carry—it preserves battery without sacrificing readiness. Battery type varies by model, so check your manual and keep a spare in your range bag.
Common Red Dot Brightness Mistakes and How to Fix Them
Mistake #1—Setting Brightness Once and Forgetting It
You zero on a bright outdoor range, leave it on max, and never adjust again. Then you’re running low-light drills and wondering why the dot looks like it exploded. Fix: treat brightness like a round count check—quick, habitual, every time your environment changes.
Mistake #2—Cranking Brightness to Max in Low Light
More brightness at night means blooming and a dot that tells you more about your lens than your point of aim. Start at your lowest standard setting in low light and increase only if you genuinely can’t locate the dot.
Mistake #3—Relying on Auto-Brightness for All Situations
Auto-brightness reads the light behind your optic, not necessarily the light in front of you—especially with a weapon light active. Practice manual adjustment until it takes zero conscious thought.
Mistake #4—Ignoring Astigmatism’s Effect on Brightness Perception
Astigmatism is far more common than most people realize—affecting roughly one in three Americans, according to the American Optometric Association. If that’s you, higher brightness settings will make reticle distortion visibly worse. That starburst or smear isn’t a defective optic—it’s your eye’s response to excess light input.
Fix: dial brightness down until the dot is as clean as possible. On MOA size, experiment—many shooters with astigmatism do better with a larger dot (4–6 MOA) at lower brightness, since the wider shape holds up better against distortion. Corrective shooting glasses or prescription inserts can help significantly as well.
Optic-Specific Brightness Controls
Common Control Layouts—Buttons, Dials, and Knobs
Most pistol optics use up/down buttons on the rear housing. Most rifle optics use a rotary dial on the side of the housing, though the exact position varies by brand. Buttons are quick to cycle in sequence; dials offer tactile feedback by feel under gloves or in the dark. Know your layout before you need it, and practice blind adjustments in dry-fire.
How to Find Your Optic’s Night Vision Settings
On most NV-capable optics, NV settings are positions 1 and 2 at the bottom of the standard brightness scale. Aimpoint is a key exception—depending on the model, the first four to seven settings are designated for NV use only. On the Leupold DeltaPoint Pro NV, settings 1 and 2 are explicitly built in as NV modes.
There’s no single universal access method across brands—always confirm in your owner’s manual.
Brightness and Dot Size—Understanding the Relationship
A larger MOA dot carries more surface area, which means more perceived brightness and a bigger bloom at the same setting. For shooters without astigmatism, a smaller dot at lower brightness settings tends to give the cleanest aiming point in low-light. For shooters with astigmatism, a larger dot (4–6 MOA) at lower brightness often performs better—the shape holds up despite the distortion. Test both and trust what you see.
Conclusion
Managing your red dot brightness is one of the simplest but most consistently neglected parts of running an optic well. The right setting makes your sight work with your eyes in daylight, low light, and darkness. Use the minimum brightness that gives you a clean, crisp dot—and adjust it every time your environment changes.
Ready to find a sight with the brightness range and controls you actually need? Browse the full selection at Gold Trigger and find the right setup for the way you shoot—day or night.
Disclaimer: The information provided in this article is intended for educational purposes only and is directed toward lawful firearm owners, licensed hunters, competitive shooters, and tactical professionals. Proper use of any firearm optic, including red dot sights, requires compliance with all applicable federal, state, and local laws. Always handle firearms safely and in accordance with manufacturer guidelines. Never adjust optic settings or perform any firearm maintenance while the firearm is loaded or pointed in an unsafe direction. The use of night-vision-compatible optic settings may be subject to legal restrictions in your jurisdiction—consult local regulations before use. This content does not constitute legal or tactical advice. Always seek qualified firearms instruction from a certified professional.
Comments