



Red Dot Mounts Explained: What You Need to Know
Published on: July 13, 2026
Reading time: 8 mins
This guide walks you through what a red dot mount does, the different types you’ll encounter, and how to choose the right one for your pistol or AR-15. We’ll also cover where to mount it and the most common mistakes people make when installing one.
The goal is for you to know enough to shop with confidence.
Highlights
- A mount’s job is to attach your optic, set its height, and keep your zero consistent every time you take it off and put it back on.
- Footprint compatibility is the single biggest factor in choosing a mount, especially for pistols.
- AR-15 optics belong on the receiver, not the handguard, for the steadiest zero.
- Quick-detach (QD) mounts let you pull your optic off and get it back to the same spot.
- A lot of mounting failures trace back to skipped torque or thread locker, not a bad optic.
What Is a Red Dot Mount, Exactly?
Let’s clear up some confusion first. A lot of people use “red dot mount” to mean the whole optic. That’s not quite right.
The optic is the sight itself, the part with the glass and the dot. The mount is separate. It’s the hardware that holds that optic onto your gun. The footprint is the shape of the connection between the two, basically the pattern of screws and pins that have to line up.
Think of it like a phone case. Your phone is the optic, the case is the mount, and the cutouts for the buttons and camera are the footprint. If those cutouts don’t line up with your phone, the case just won’t sit right, no matter how good the case is on its own.
A mount has three real jobs:
- It physically attaches the optic to your firearm.
- It sets the optic’s height relative to your barrel and your eye line.
- It keeps your zero consistent, even after you take the optic off and put it back on.
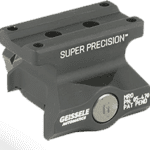
Most mounts are pretty simple: a base plate, some screws, and sometimes a built-in lever or riser block. On an AR-15, plenty of optics already come with a mount attached, so you’re just bolting one piece onto your rail.
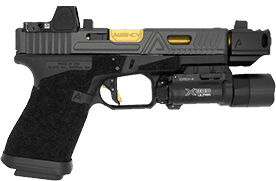
Pistols work a bit differently. Even when there’s no separate mount piece involved, your optic still has to match your slide’s cut exactly, and that matched cut is doing the same job a separate mount would do on a rifle.
Why the Right Mount Matters More Than People Think
A loose screw or the wrong thread locker causes far more zero problems than a “bad” optic ever does. Modern red dots are genuinely tough pieces of equipment, so when something goes wrong, it’s usually the hardware holding the optic on, not the optic itself.
A cheap or mismatched mount can flex under recoil. That flex adds up shot after shot, and your zero drifts before you even notice it happening.
A solid mount, properly installed, holds that zero through thousands of rounds.
Mount choice also shapes how your gun feels when you shoulder it. Sight picture and cheek weld both come down to mount height. And if you’re running iron sights alongside your optic, that same height decision sets your co-witness.
The big takeaway here is simple: there’s no single “best” mount for everyone. The right one depends on your platform, your optic’s footprint, and how you actually plan to use the gun.
The Main Types of Red Dot Mounts
Mounts generally fall into a few categories. Knowing which one applies to your setup makes shopping a lot easier.
Footprint-Specific Mounts and Plates
This is the category most pistol shooters need to understand. Names like RMR, RMSc, Holosun K, and Docter all refer to specific footprint shapes, the exact screw and pin pattern on the bottom of the optic.
These footprints aren’t interchangeable. An optic built for one footprint usually won’t bolt onto a mount built for another unless you add an adapter plate in between. This is mostly a pistol concern, though a handful of enclosed-emitter rifle optics use the same footprint-style mounting.
Picatinny and Weaver Rail Mounts
If you’re running an AR-15, this is your default setup. The Picatinny rail is a standardized rail system, officially designated MIL-STD-1913, originally developed for the U.S. military and now used on nearly every modern rifle platform.
It actually started out as a way to mount scopes on larger-caliber rifles, then expanded over time to include iron sights, lights, lasers, and reflex sights.
Riser Mounts
A riser simply raises your optic up off the rail. This matters most for AR-15 shooters who need a proper cheek weld or want a specific co-witness height with their iron sights.
Quick Detach (QD) Mounts
A QD mount lets you take your optic off and put it back on without losing your zero. Some use a throw lever; others use a push-button or thumbscrew clamp, but the goal is always the same: fast removal, reliable return.
QD mounts cost more than fixed ones, but for a lot of shooters, that convenience is worth the price difference.
Offset and Cantilever Mounts
If you’re running a magnified scope and want a backup red dot for close range, an offset mount angles that dot 35 to 45 degrees off to the side.
How to Choose the Right Red Dot Mount
Shopping for a mount gets a lot easier once you know what order to make decisions in. Here’s the framework:
- Match your footprint first. This is non-negotiable, especially for pistols. If your optic’s footprint doesn’t match your mount or slide cut, it simply won’t fit.
- Confirm your platform. Pistol slide-cut, plate-mounted, or AR-15 rail all come with different mounting needs.
- Decide your height. This sets your sight picture and co-witness setup with iron sights.
- Choose fixed or QD. Fixed mounts are simpler and usually cheaper. QD mounts cost more but let you remove the optic fast.
- Check the build quality. Look at the material, usually aluminum or steel, and how tight the machining tolerances feel in hand.
- Think about your use case. Duty and carry, range and competition, and hunting all call for slightly different priorities.
If you remember nothing else, remember this order: footprint first, height second, QD or fixed third. Footprint either works or doesn’t; height is a preference layered on top of a compatible mount; and QD versus fixed is the easiest of the three to change your mind about later.
Where to Mount a Red Dot on an AR-15
Your red dot belongs on the upper receiver, not the handguard. The receiver is a single machined piece of metal, far more rigid than a handguard could ever be. A handguard, even a good free-floated one, can shift slightly under pressure from your support hand, a sling, or a barricade, and that tiny shift can move your zero without you ever noticing.
From there, mount as far forward on the receiver as you reasonably can without crossing onto the handguard. A more forward position opens up your peripheral vision and helps you transition between targets faster. Mounting too far back crowds your sight picture and can make the gun feel cramped when you’re trying to move fast.
A couple more placement notes worth knowing:
- If you run backup iron sights, your dot’s position affects how those irons line up through the optic window. That’s the co-witness relationship we mentioned earlier.
- If you’re running an offset dot alongside a magnified scope, that one mounts in roughly the same general area, just canted off to the side.
How to Mount a Red Dot Sight on a Pistol
Mounting a red dot on a pistol involves a few more steps than slapping it on a rifle rail, but it’s manageable once you know the order of operations.
- Confirm compatibility before you buy anything. Check whether your slide already has a cut for your optic’s footprint, or whether you’ll need an adapter plate.
- Remove the existing cover plate if your slide came with one, and swap in the correct adapter plate if your footprint calls for it.
- Use the correct torque. Every optic and mount manufacturer sets its own torque value, and those numbers genuinely vary between brands. Always check your specific manufacturer’s spec instead of guessing or borrowing a number you saw somewhere else.
- Apply the right thread locker. Stick with a removable low or medium-strength option, and skip the high-strength “permanent” formulas unless your manufacturer specifically tells you to use one.
- Check your alignment before you head to the range. A quick visual check and a dry-fire confirmation now save you wasted ammo later.
The theme across all five steps is the same: don’t guess, and don’t assume one number or one product works for every optic out there.
Common Red Dot Mounting Mistakes (and How to Avoid Them)
Most mounting problems are avoidable once you know what to look for. Here are the ones we see most often:
- Buying a mount before checking the footprint. This is one of the most common and most frustrating mistakes, mainly because it’s the only one on this list that can make installation flat-out impossible rather than just less ideal.
- Over-torquing the screws. Too much force can crack the optic housing or strip the threads on your mount. More isn’t better here.
- Skipping the thread locker or using the wrong strength. Recoil and vibration will work screws loose over time without it.
- Picking a height based on looks instead of function. Your co-witness needs should drive your height choice, not how “tactical” a tall mount looks on the gun.
- Mounting too far back on an AR-15. This crowds your sight picture and slows down target transitions.
- Assuming “universal” mounts fit every footprint. They don’t. Footprint compatibility has to be confirmed for every optic, every single time.
Red Dot Mounts by Platform: Quick Comparison
| Platform | Typical Mount Type | Common Footprint | Height Consideration | Common Failure Point |
|---|---|---|---|---|
| Pistol | Footprint-specific plate or direct cut | RMR, RMSc, Holosun K, Docter | Usually fixed by the slide cut | Wrong torque or skipped thread locker |
| AR-15 | Picatinny rail mount or riser | Standard Picatinny base | Co-witness height with irons | Mounted too far back, or on the handguard |
| Offset/LPVO setups | Cantilever or 45-degree offset mount | Picatinny, canted | Matches primary optic height | Misalignment of the cant angle |
Conclusion
A red dot mount might look like a small accessory, but it’s the piece that decides whether your optic actually performs the way it’s supposed to. Get the footprint right, pick a height that fits how you shoot, and decide whether QD convenience is worth it for your setup.
From there, it really comes down to installation. The right torque, the right thread locker, and a quick alignment check before you head to the range will save you from nearly every common mounting failure we covered above.
If you have the mount and are looking for a red dot now, browse our selection of red dot sights and gear up with confidence. You can also call us at 713-485-5773.
Disclaimer: This article is for general informational and educational purposes only and does not constitute professional, legal, or safety advice. Always consult your firearm’s owner’s manual, your optic manufacturer’s specifications, and a qualified gunsmith before installing, modifying, or mounting any sighting system. Improper installation, incorrect torque, or incompatible hardware can result in equipment failure, loss of zero, or personal injury. Firearms and related accessories are regulated products—confirm compliance with all applicable federal, state, and local laws before purchase, modification, or use. Gold Trigger assumes no liability for damage, injury, or legal consequences arising from the use of information provided in this guide.
Comments